
Previous Part 4
10. Traverse Planning
In this final part I will share a few words on how to plan an alpine style traverse during any season. For more detail / aspects of traverse planning check out Chapter 3 of the Alpine Hiking Bootcamp. Let’s assume we which to plan a traverse along some of the 700 mountain passes of Jammu and Kashmir. Depending on the season and taking into account the altitude of passes we could plan a winter traverse below 2500m (dark blue), a spring traverse below 3500m (light blue) and a high altitude summer traverse above 4000m (red).
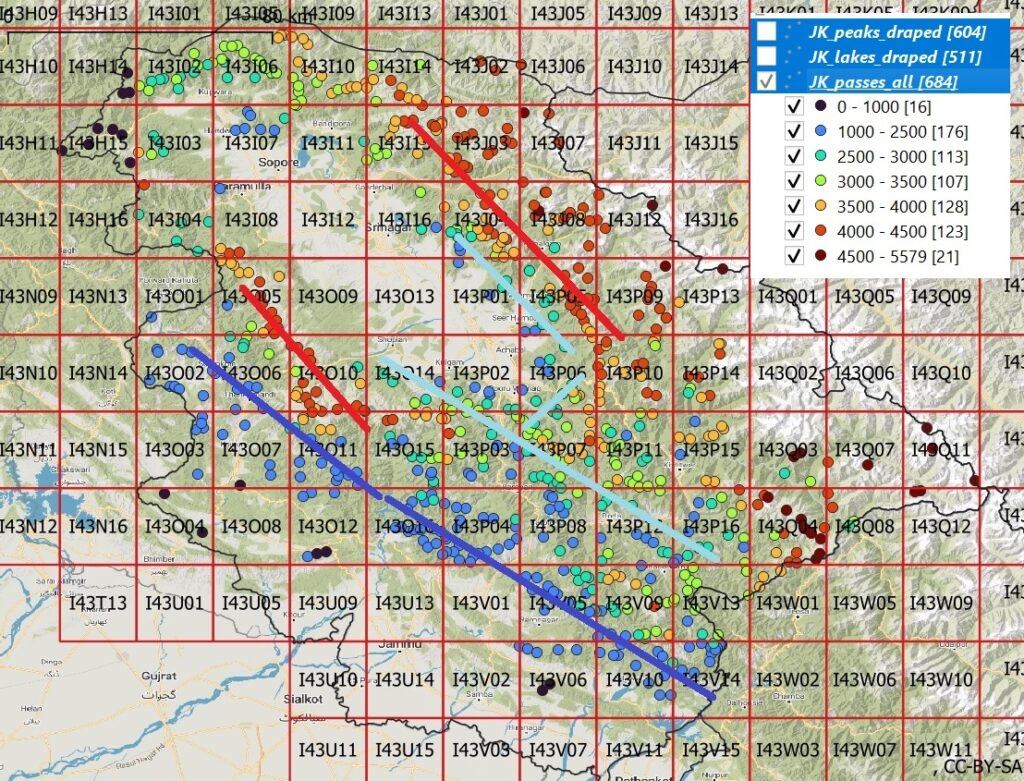
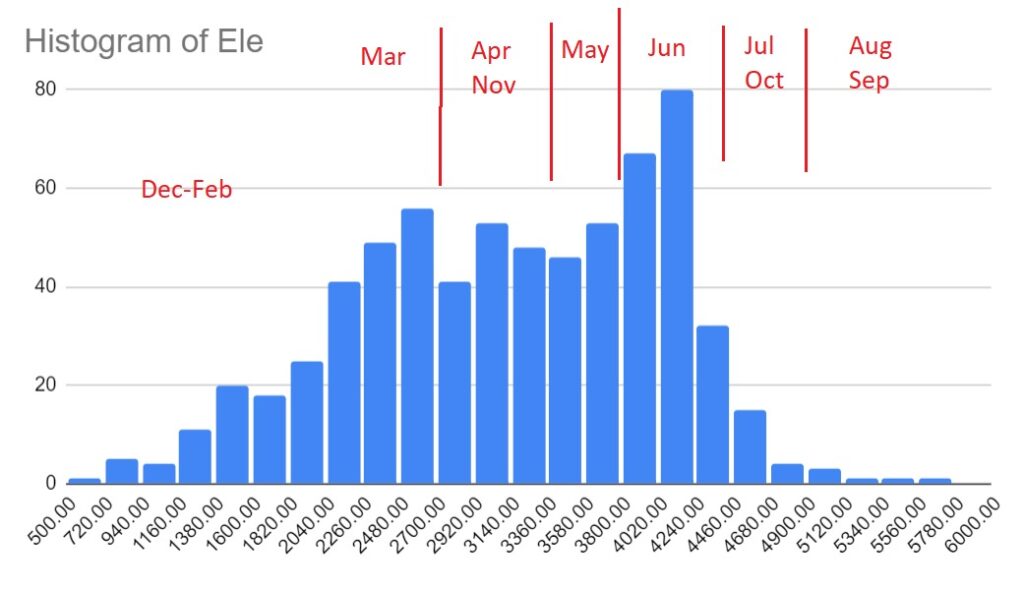
Depending on the season (snow line) we can focus on passes of a specific elevation range. Below histogram shows the distribution of mountain passes as per elevation. I (roughly) mapped each altitude range to a specific month of the year when those corresponding passes will be open / hike-able. The same months are usually mentioned on the Survey of India maps for well known passes. We can see that a good number of passes (Y-axis) are available to hike in each season, descending to foothills during winter and exploring the higher ranges during summer.
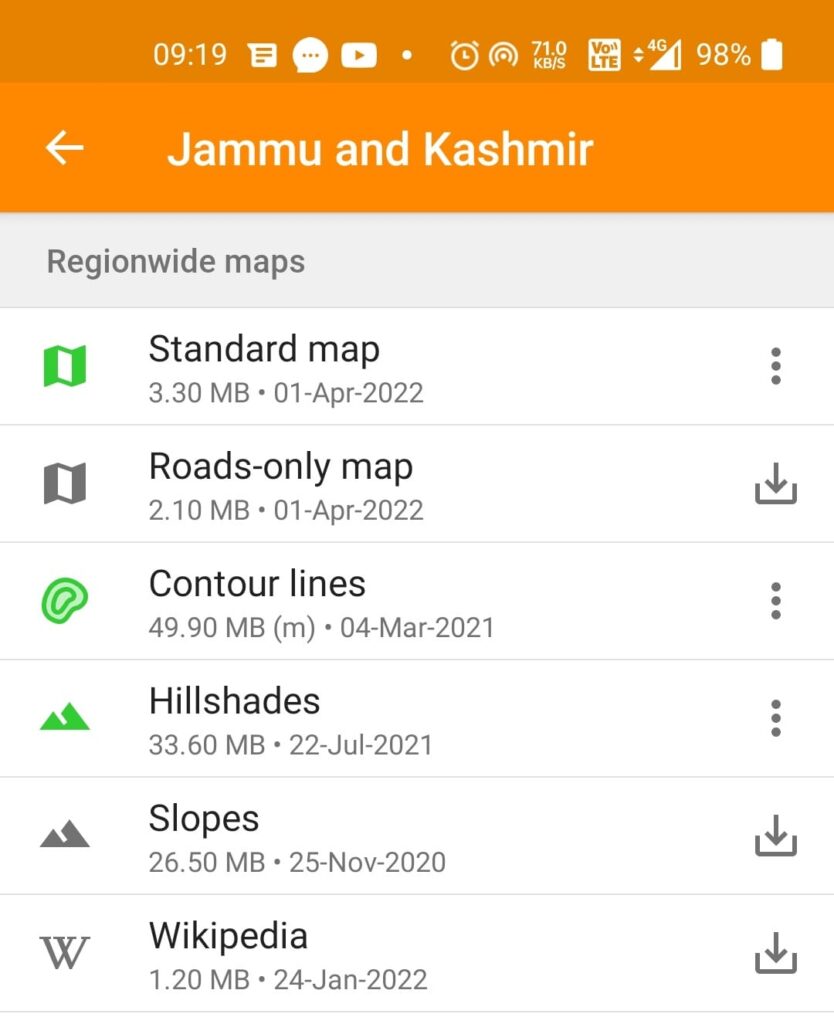
My favorite mobile app for offline maps, traverse planning and field navigation is OSMAnd. It’s easy to use and is fast even when working with huge state-level maps and trail datasets. Start by downloading the base OSM Map + Contours + Hillshades for Jammu & Kashmir. Downloading means they are available for offline navigation when out of mobile network.
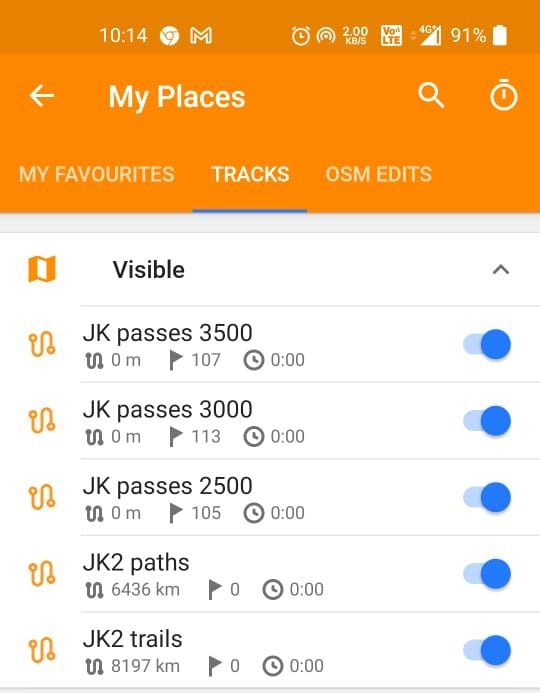
Next step is do download digitized legacy trails and mountain passes (GPX) for various altitude ranges (500m increments). Legacy trails show us the possible routes which can be explored and passes identify the regions accessible during each season. Both can be overlaid on top of the OSM basemap to assist the alpine hiker in planning and navigating a traverse.
Below shows the OSMAnd main screen showing an OSM basemap with hillshading to understand the topography of the terrain. Passes up to 3500m are overlaid below to show which ranges are traversable in the month of May. Thirdly we will focus on exploring the green / forest regions which will be wilder / untouched / beautiful rather then the inhabited cultivated regions.
Additionally overlaying digitized trails (pink) and paths (purple) we can start planning a continuous traverse by interconnecting target mountain passes. Mapped settlements are shown on the OSM basemap offering useful stops for guidance, food supply and possible night shelter. We maximize coverage of the forest (green) regions. The beauty of OSM and digitized trails is that they are vector based and can be viewed at any zoom level – high scale for long distance / overall traverse planning and lower scale for day-wise planning.
OSMAnd allows the user to set markers (flags) to plan a route / traverse connecting mountain passes and in-between settlements. The markers can be viewed on both the map and tabular format. Flight distance to each marker from your current location is given allowing you to plan approximate distance and duration (and progress) as you navigate along the planned route.
Once you marked / flagged relevant targets (passes, lakes, views, ridgelines, settlements, campsites…) you will automatically see possible linear or circular traverses appear on the map which you can connect. I usually do not fix my route in advance as the actual taken route will depend on weather conditions, snow fall and trail conditions. Having the possible points / routes mapped allows you to plan your route dynamically in the field as you progress.
As we zoom in further at a lower scale we can see the various OSM mapped terrain features appear – passes, peaks, lakes, streams, glaciers, settlements, etc. OSMAnd also supports offline contours which allow you to visualize the topography of the terrain and assess the steepness of your planned traverse. Understanding both horizontal distance and vertical steepness will allow you to estimate time and effort required to reach your next target.
Finally, during actual field navigation we can zoom further at the lowest scale (200-500m) to view trails, intersections and stay on track. OSMAnd further allows use of offline overlay maps to provide additional terrain details. I usually use Survey of India freely downloadable maps which have the most detailed terrain details for the Himalayas – settlements, forest types, contours, streams, gullies, trails, etc.
I hope this 5 part series on Jammu and Kashmir diving deeper into Open Street Maps, terrain features and traverse planning gave insight into the significant geo-data available for alpine hikers to plan their exploration journeys. Other Himalayan states (Ladakh, Himachal, Uttarakhand) have been mapped in same detail in Open Street Maps. J&K was just presented here as one example.
More details and aspects of Himalayan exploration is presented in my 40 module Alpine Hiking Bootcamp, available online for free. Further doubts, suggestions…? Don’t hesitate to drop a message.
Peter
It’s a treasure. Thank you Peter.